


Setting Up Selenium Python ChromeDriver in PyCharm: Chrome for Testing Updates


The software testing world is always changing. Just last week, at my desk, I tried running some Selenium Python tests I made a few months ago. But when I clicked ‘run’, I got this error: “This version of ChromeDriver only supports Chrome version 114. The current browser version is 116.0.5845.110 with binary path…“
I sighed, thinking, “Here’s that error again!” Truth be told, if I had a dollar each time this popped up in my career across different frameworks, I’d be chilling on a beach, enjoying a refreshing drink.
This repetitive annoyance drove me to draft this blog and produce a related video. Hopefully, after this, you won’t run into this Chrome version mismatch issue or at least will know how to solve it moving forward.
In this guide, I’ll show you how to set up Selenium Python ChromeDriver in PyCharm. I’ll also talk about why these Chrome changes are important for testers. Ready to learn and avoid these errors? Let’s go.
The Importance of ChromeDriver in Selenium Testing
Ever tried talking to someone who speaks a different language? That’s what it’s like for the Chrome browser when it sees Selenium tests. That’s where ChromeDriver comes in as our translator. It’s the go-between that makes sure Chrome and Selenium are on the same page.
Think of it this way:
Selenium scripts, whether they’re in Python, Java, or JavaScript, are like a foreign film to Chrome.
ChromeDriver is like the subtitles, making everything clear and understandable.
Without ChromeDriver, it’s like watching that film without subtitles. You’d miss out on the plot, right? Similarly, we’d miss out on successfully running our web app tests without the help of ChromeDriver.
Recent Updates from Chrome for Testing
Chrome has introduced a dedicated browser known as “Chrome for Testing.” This version is tailored specifically for web app testing and automation scenarios.
Motivation:
The primary goal was to address challenges developers face with browser testing.
A major concern was the auto-update feature of Chrome. While beneficial for regular users, it can cause inconsistencies for developers running end-to-end tests.
Features of “Chrome for Testing”:
Eliminates the auto-update feature, ensuring consistent and reproducible test results.
Integrated directly into the Chrome release process. This ensures testers have a versioned binary that mirrors regular Chrome without features that might impact testing.
Availability: This version is up for grabs for every Chrome release across all channels: Stable, Beta, Dev, and Canary
Setup Selenium Python Chromedriver in PyCharm
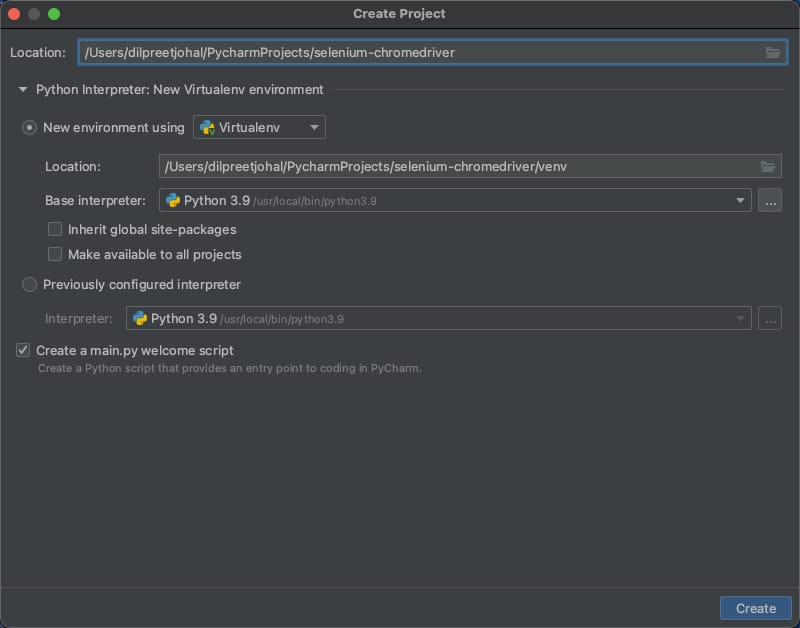
Starting in PyCharm:
Open PyCharm and choose ‘Create New Project.’
Name your project and pick a spot to save it.
Setting Up a Virtual Space (venv):
Make sure ‘New environment’ is chosen.
Pick ‘Virtualenv’ for the type.
Decide where you want this virtual space and pick your Python version.
Click ‘Create.’
Getting What We Need:
With your project ready, go to the terminal in PyCharm.
Add the tools we need with pip:
pip install selenium
pip install webdriver-manager
Diving into the Code
Now that we’re set up let’s take a closer look at the code:
from selenium import webdriver
from selenium.webdriver.chrome.service import Service as ChromeService
from webdriver_manager.chrome import ChromeDriverManager


def verify_title():
    chrome_binary_path = "binaries/Google Chrome for Testing 116.app/Contents/MacOS/Google Chrome for Testing"

    options = webdriver.ChromeOptions()
    options.binary_location = chrome_binary_path

    # Automatically download and use the latest ChromeDriver
    driver = webdriver.Chrome(service=ChromeService(ChromeDriverManager(driver_version='116').install()), options=options)

    # Navigate to the website
    driver.get("https://sdetunicorns.com")

    # Get the title of the page
    title = driver.title

    # Verify the title
    expected_title = "Master Software Testing and Automation | SDET Unicorns"
    if title == expected_title:
        print("Title verification successful!")
    else:
        print(f"Title verification failed. Expected '{expected_title}', but got '{title}'.")

    # Close the browser
    driver.quit()


if __name__ == "__main__":
    verify_title()
This part of the code brings in the tools we need. It prepares ChromeDriver and makes sure we’re using the right version for Chrome 116.
The verify_title() function does a few things:
It tells the code where to find the Chrome version we’re testing with.
It sets up ChromeDriver with the right settings.
It goes to the SDET Unicorns website.
It checks the website’s title to make sure it’s what we expect.
After checking, it closes the website.
Resources and Further Reading
Want to know more about the recent changes in Chrome? Here’s a helpful guide that talks about the latest updates.
Get started with Selenium Python using the SeleniumBase framework through this comprehensive playlist.
To get the Chrome for Testing tools, head to the Chrome for Testing dashboard. It’s a handy place that has everything we need for our tests.
If you’re interested in a deeper dive into setting up ChromeDriver in PyCharm, this video tutorial is a great resource. It covers everything in detail.
Wrapping Up
With the latest from Chrome and the tools in PyCharm, you should now be set to run your tests smoothly. I hope this guide helped you set up Selenium Python ChromeDriver in PyCharm without any issues.
If you have any questions or run into challenges, please leave a comment below. Always keep learning and testing, and thanks for reading!